The need to work with the highest possible video bitrate, often with raw codecs, makes the color grading process one of the most performance-demanding in the post-production workflow. To meet these requirements, every component of the setup must be optimised. These include the network and client settings, as well as the application settings. This blog will show you how to optimise your DaVinci Resolve on Mac Studio setup for performance over an SMB connection.
If you require a general overview of achieving better playback performance in DaVinci Resolve, head to our blog: DaVinci Resolve: 5 ways to achieve better playback performance
DaVinci Resolve Settings
Set Memory Usage Limit
DaVinci Resolve 18 requires at least 8 GB of system memory to run on macOS and 16 GB when using Fusion. This is the lowest possible amount of RAM to get Resolve up and running. It is recommended that memory allocation for DaVinci Resolve is increased to 32 GB or above. Please keep in mind that the amount of RAM required for optimum performance depends on your workflow. To set a memory limit navigate to Preferences > Memory and GPU > System. The maximum and the default setting for this preference is 75 percent of your system’s RAM.

UI Settings
In DaVinci Resolve, navigate to Preferences > User > Playback Settings and check the “Hide UI overlays” and the “Minimize interface updates during playback”. These settings can improve real-time playback performance.

Disable Direct I/O
This feature allows DaVinci Resolve to write directly to the drive using the kernel buffers, bypassing the normal storage cache in RAM. This theoretically allows access to the full performance of the drive when using Linux OS. However, enabling Direct I/O will likely decrease performance in virtually any case. In our 4K 16bit DPX export test on Mac Studio, enabling the Direct I/O feature resulted in exports that were approximately 5X slower.
Navigate to Preferences > System > Media Storage and turn off Direct I/O on the added mounts.
General Settings
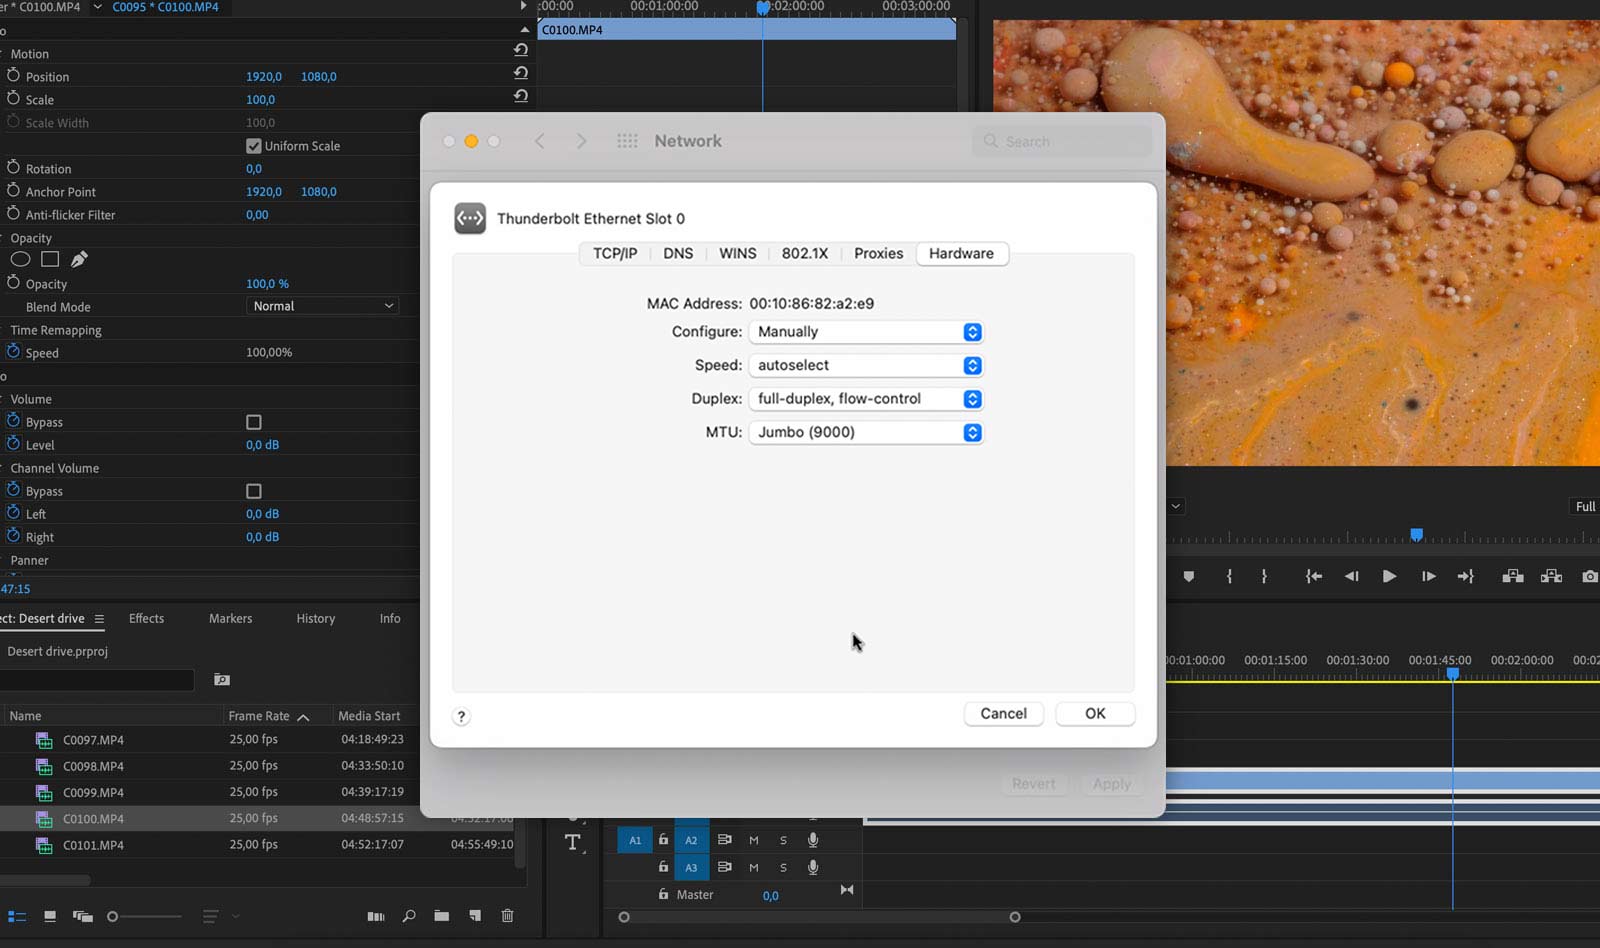
Turn on Jumbo Frames
If every component of your network infrastructure supports it, set packet size to jumbo frames. When jumbo frames are enabled, one can expect an improvement in performance thanks to the fact that every network package will be able to carry more data. You can expect the increased throughput to result in better overall Resolve performance. To set jumbo frames on macOS: access the System Preferences > Network and select the network interface. Click the „Advanced…“ button in the lower right. In the Advanced window select the „Hardware“ tab and set „Configure:“ to „Manually“. Set MTU to „Custom“ and enter „9000“.
If any of the network components do not fully support jumbo frames, it is recommended to use the default MTU 1500 setting to avoid performance degradation.
Turn Off SMB Package Signing
With the release of macOS 10.12 Sierra, Apple has increased the security of network shares with the more up-to-date SMB2 and SMB3 protocols. Now, during a transfer, each packet is signed and optionally encrypted. However, this feature is generally not necessary for internal networks and can harm the performance of the connection. This is why turning it off in nsmb.conf is recommended. If you are not using ELEMENTS storage, navigate to /etc/nsmb.conf and add the following two lines:
[default]
signing_required=no
If you however use ELEMENTS storage, you don’t have to worry about this step. The ELEMENTS Client that the users use to connect workspaces automatically uses connection settings for optimal performance, one of which is disabling SMB packet signing.
ATTO 360 Tuning
If your editing suite is connected to the storage through an ATTO network card, you can try the ATTO 360 application. Besides offering all relevant information regarding your card, it also provides seven tuning profiles. These profiles optimise the card settings for things such as high throughput, low latency or individual network protocols. For best Resolve performance over an SMB connection, we recommend activating the SMB tuning profile and restarting the Mac Studio afterwards. In our test, using SMB tuning profile makes an export finish about two times faster compared to the default profile.
4K 16bit DPX export test of a 5-minute sequence:
Default profile export time: 11:20
SMB profile export time: 5:01

Judging the Playback Performance
Upon starting playback in the source or the timeline monitor, a playback frame rate will appear above the video. This function allows you to easily recognise if the application can play back the footage in real time. If that is the case, a green dot will be displayed. If not, the dot turns red and the actual playback frame rate is displayed.

To better judge the playback performance, turn the “Show all video frames” feature on in the three dots menu on the upper-right corner of the playback window. When turned on, every single frame will be displayed sequentially, if necessary, in slower-than-real-time while the audio playback is compromised. This is the opposite of the typically default NLE playback mode which leaves out video frames in moments of insufficient processing power to maintain real-time audio playback.
If required, DaVinci Resolve can stop the playback if a frame has been dropped. To turn this feature on, navigate to Preferences > User > UI Settings and check “Stop playback when a dropped frame is detected”.
Check the Transmission Speed
If you have tried all of the mentioned settings and optimisations and you still struggle to playback footage that should comfortably fit through your connection, it is a good idea to check the transmission speed between the client and the shared storage. This can be done via tools such as AJA System Test or Blackmagic Disk Speed Test which measure the read and write performance using video files.
 AJA System Test values over a 25 GbE SMB connection
Iperf is one of the best tools for this job and works differently than the two previously mentioned tools. Iperf allows you to measure the transmission speed between two network knots without utilising anything other than RAM and the connected network interfaces. Before starting the tests, make sure to have proper infrastructure documentation to execute the tests without any possible enhancements. Download Iperf, navigate to the Iperf folder and run the test in both directions.
Server to client with a TCP window size of 1024 kB:
Server side: iperf -w 1024k -s
Client side: iperf -w 1024k -c „server IP Address“
Client to server with a TCP window size of 1024 kB:
Client side: iperf -w 1024k -s
Server side: iperf -w 1024k -c „client IP Address“
If you are interested in how to achieve maximum performance on a high-speed Ethernet link, head to our blog: How to achieve maximum performance on a high-speed Ethernet link
Did you know that Blackmagic released DaVinci Resolve 18 Reference Manual with more than 4000 pages? We have published it together with a list of quick links to individual chapters – check it out here!