High bitrates, project-sharing requirements, and different codecs are some of the reasons why working with video demands substantial technical knowledge and a solid grasp of data management. You can think of every video post-production setup in a shared environment as consisting of four main components. Shared storage holds your data (footage, projects and everything else) and makes it available to those connected to it. The network allows communication between the storage and the workstations, which provides a platform for the fourth component, the application, in this case, DaVinci Resolve. This blog will review these components and highlight potential soft spots and their solutions to achieve the best DaVinci Resolve performance.
Due to its fantastic colour grading capabilities, Resolve is often used together with other NLEs. We have also written extensive guides on achieving maximum performance with Avid Media Composer, and Adobe Premiere Pro, so be sure to check them out.
We’ve also written this blog post that focuses on the new Mac Studio and the optimal settings for DaVinci Resolve performance over an SMB connection.
Judging the Playback Performance
Though bad playback performance is usually easy to spot, DaVinci Resolve also offers a few useful features to judge the performance objectively. A playback frame rate will appear above the video after starting playback in the source or the timeline monitor. This function lets you quickly recognise if the application can replay the footage in real-time. If that is the case, a green dot will be displayed. If not, the dot turns red, and the actual playback frame rate is displayed.

To better judge the real-time playback capability, turn the “Show all video frames” feature on in the three dots menu in the upper-right corner of the playback window. When turned on, every single frame will be displayed sequentially, if necessary, in slower-than-real-time while the audio playback is compromised. This is the opposite of the typically default NLE playback mode, which leaves out video frames in moments of insufficient processing power to maintain real-time audio playback.
DaVinci Resolve can stop the playback if a frame has been dropped. To turn this feature on, navigate to Preferences > User > UI Settings and check “Stop playback when a dropped frame is detected”.
Workstation
The centrepiece of your editing suite must be set up correctly; it must provide sufficient system resources, have the correct recent drivers installed, and not be hindered by performance-decreasing software.
System Requirements
The amount of system resources that Resolve requires from your computer depends on your workflow. Generally, your editing workstation must have a 64-bit operating system and enough RAM. A modern quad-core CPU or greater is required, and a powerful graphics card is recommended. Make sure to run appropriate drivers (in most cases, the latest version) to support the hardware of your editing client and be careful when updating graphics card drivers, as the minimum requirements and recommended drivers differ between versions of DaVinci Resolve.
The following are minimum system requirements for DaVinci Resolve version 18:
Mac OS
- macOS 11 Big Sur
- 8 GB of system memory. 16 GB when using Fusion
- Blackmagic Design Desktop Video version 12.0 or later
- Integrated GPU or discrete GPU with at least 2 GB of VRAM.
- GPU which supports Metal or OpenCL 1.2.
Windows
- Windows 10 Creators Update.
- 16 GB of system memory. 32 GB when using Fusion
- Blackmagic Design Desktop Video 10.4.1 or later
- Integrated GPU or discrete GPU with at least 2 GB of VRAM
- GPU which supports OpenCL 1.2 or CUDA 11
- NVIDIA/AMD/Intel GPU Driver version – As required by your GPU
Linux
- CentOS 7.3
- 32 GB of system memory
- Blackmagic Design Desktop Video 10.4.1 or later
- Discrete GPU with at least 2 GB of VRAM
- GPU which supports OpenCL 1.2 or CUDA 11
- NVIDIA/AMD Driver version – As required by your GPU
Reboot the Computer
A simple client reboot can solve many problems, especially if the computer has been running for long periods. One of the main culprits for performance degradation over time is too little RAM at the program’s disposal.
Antivirus Software
Running Windows Firewall, Windows Defender, or other anti-virus software on your editing clients can hurt the client’s performance. Therefore, the most commonly recommended course of action is to disable these services whilst restricting Internet access to the editing clients.
DaVinci Resolve Settings
Performance issues in Resolve can also result from using the Application in a less-than-optimal way. Try the following settings and see if they positively impact the performance. An important thing to remember is that if you have experienced a sudden decrease in performance, it probably stems from changes in your setup or workflow.

RAW Footage Resolution
If working with raw footage, navigate to the Project Settings > Camera Raw and lower the decode quality. Lower-resolution media increases performance at the cost of video quality .
Lower the Timeline Resolution
Test if lowering the timeline resolution remedies your playback issues by going to Project Settings > Master Settings > Timeline Resolution. Choose a resolution that is lower than that of your footage. Remember to switch the resolution back to the original before exporting the timeline.
Render In Place
Using the Render In Place function is the easiest way to make clips with applied effects and overlays play back smoothly. It is an essential rendering function that will create a new clip and put it in place of the old one. This feature can be found in the right-click menu of any clip in the timeline.

Proxy Mode
Start by checking if the Proxy mode is turned on. The somewhat misleadingly named Proxy mode has nothing to do with proxy files or offline editing. This function allows the user to downscale the video’s resolution in real time to achieve a smoother playback. Navigate to Playback > Timeline Proxy Resolution and choose the desired setting. The playback can be scaled down to half resolution, quarter resolution or turned off.
Performance Mode and Playback Settings
The Performance Mode feature and Playback settings can be found in the User section of the Preferences menu (DaVinci Resolve > Preferences > Users > Playback Settings). These settings determine how the image is sized, decoded and processed and can therefore impact on the playback performance. Make sure the automatic setting is selected. The details of the Performance mode settings are described in the DaVinci Resolve 18 Reference Manual.
Set to Automatic, Performance mode automatically optimizes a variety of operations in a bid to balance performance with the necessary level of image quality, for fast onscreen performance while always maintaining the highest level of quality for video output.
The Playback Settings menu provides two more functions that can improve the playback performance but are turned off by default.
– Hide UI overlays: When enabled, onscreen controls such as the cursor, Power Window outlines, and split-screen views are disabled and hidden during playback. When playback is paused, all onscreen controls reappear.
– Minimize interface updates during playback: When enabled, user-interface updates are reduced.
Timeline Rendering
Not every element in the timeline is equally demanding to play back. Using effects and titles can introduce stuttering to the playback or even grind it to a complete halt. In such cases, Resolve offers the render feature, which will allow for smooth playback of these clips and elements. If rendering is turned on, render status bars in either blue (clip has been rendered) or red (clip hasn’t yet been rendered) will be displayed above the clip.

The user has the ability to choose between three different render modes in the Render cache menu (Playback > Render Cache):
- None: Disables rendering and the render status bars.
- Smart: This is the recommended cache mode. If the “Render Cache Fusion Output” function hasn’t been disabled for the clip in the timeline (Clip > Render Cache Fusion Output > Off), then three types of elements are rendered: Playback intensive clips (H.264, H.265, DCP, JPEG2K and camera raw clips), Speed effects and Fusion Clips or clips with Fusion Effects applied to them.
- User: Clips with “Render Cache Fusion Output” set to On are cached, while clips set to Auto are ignored, except for clips with Fusion Effects, which are automatically cached in Auto mode when the “Automatically cache Fusion Effects in User Mode” Project Setting is on.
Render Cache settings can be found in Project Settings > Master Settings > Optimized Media and Render Cache. In the Working Folders section of the same menu, the cache files saving location can be set. Make sure to choose a folder on the fast tier storage.
Use the Right Codecs
Codecs play a huge role in video editing. Compressed codecs employ and combine two techniques – Intra-frame and Inter-frame coding- to reduce the bit rate and the clips file size. Intra-frame codecs lower the bitrate by compressing individual video frames. These are the codecs like ProRes, DNxHD/HR and AVC-Intra. Intra-frame codecs are best suited for editing but carry two main disadvantages: Typically, only professional equipment can encode them, and the resulting files are still huge. Inter-frame coding, however, describes comparing and referencing multiple frames. Not every frame needs to be fully saved using this coding method, only the so-called I-frames. Slightly simplified: Other frames in the group (GOP – Group Of Pictures) will reference these frames and save only the parts of the frame that have changed. This method can lower the bit rate drastically but will do it at the cost of increased processing power needed to decode the video. So-called Long-GOP Codecs typically use both compression techniques, and some of the most popular ones include H.264 (AVC), H.265 (HEVC) and XDCAM.
Even though Long GOP formats are uniquely efficient, they are far from perfect for editing. Though technically possible, editing with Long GOP footage can drastically slow down the process. The best course of action is converting this footage using a quality intra-frame codec using Blackmagic Proxy Generator application or the proxy workflow in DaVinci Resolve.
Optimized Media
Until Resolve 17, the optimized media feature was Resolve’s only approach to realise proxy workflows. And while this approach was somewhat different than that of Avid Media Composer and Adobe Premiere Pro, it worked pretty well, albeit with a couple of significant drawbacks. One of these is that the optimized media is often quite large compared to a proxy file with similar picture quality. The other drawback is that the created optimized media can only be used in projects in the same database.
Optimized media can be created by right-clicking the selected clips in the bin or the timeline and clicking “Generate Optimized Media”. If you wish to use it in your editing process, check “Use Optimized Media if Available” in the Playback menu. Exporting a sequence that uses optimized media will export it in full resolution unless “Use optimized media” is enabled in the Advanced Settings of the export window. This feature will compromise the quality of your video for a faster export speed.
The resolution and media format settings can be found in Project Settings > Master Settings > Optimized Media and Render Cache. Using DNxHR SQ codec on a Windows client or ProRes 422 LT on a Mac is recommended. Optimized media files are stored in the Render Cache location (Project Settings > Master Settings > Working Folders). Make sure to select a location on the fast-tier storage.

Proxy Media
Due to the disadvantages associated with optimized media workflows, proxy workflows have been introduced in Resolve 17. Proxy files can be created externally or directly in Resolve and can even be shared across projects in different databases. This feature makes it possible to easily send footage to the editors over the internet – a workflow that has only gained significance since the beginning of the home office revolution.
Right-click the selected clips in a bin and choose to link existing proxy files or create them in DaVinci Resolve. If you wish to use the proxies in your editing process, check “Use Optimized Media if Available” in the Playback menu after they have been created. Unchecking this field will relink the clips to the high-resolution footage. Exporting a sequence currently connected to the proxy files will export it in full resolution unless “Use proxy media” is enabled in the Advanced Settings of the Export window.
The resolution and media format settings can be found in Project Settings > Master Settings > Optimized Media and Render Cache. As with optimized media, using DNxHR SQ codec on a Windows client or ProRes 422 LT on a Mac is recommended. Proxy files can be stored in any location available to Resolve. For proxy files created by Resolve, the proxy generation location can be set in Project Settings > Master Settings > Working Folders. Make sure to store your proxies on the fast-tier storage.
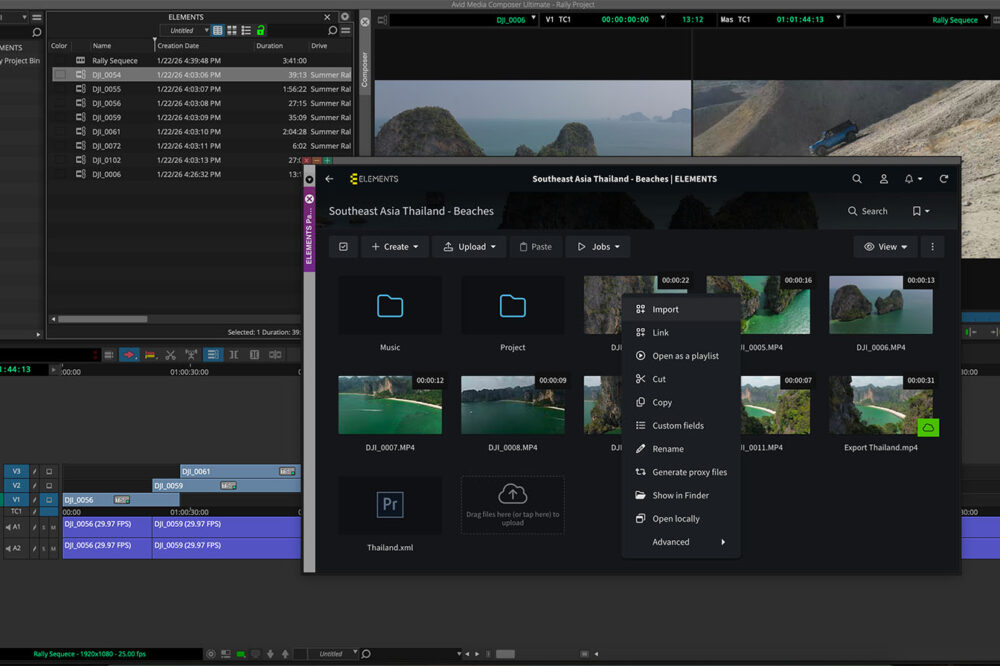
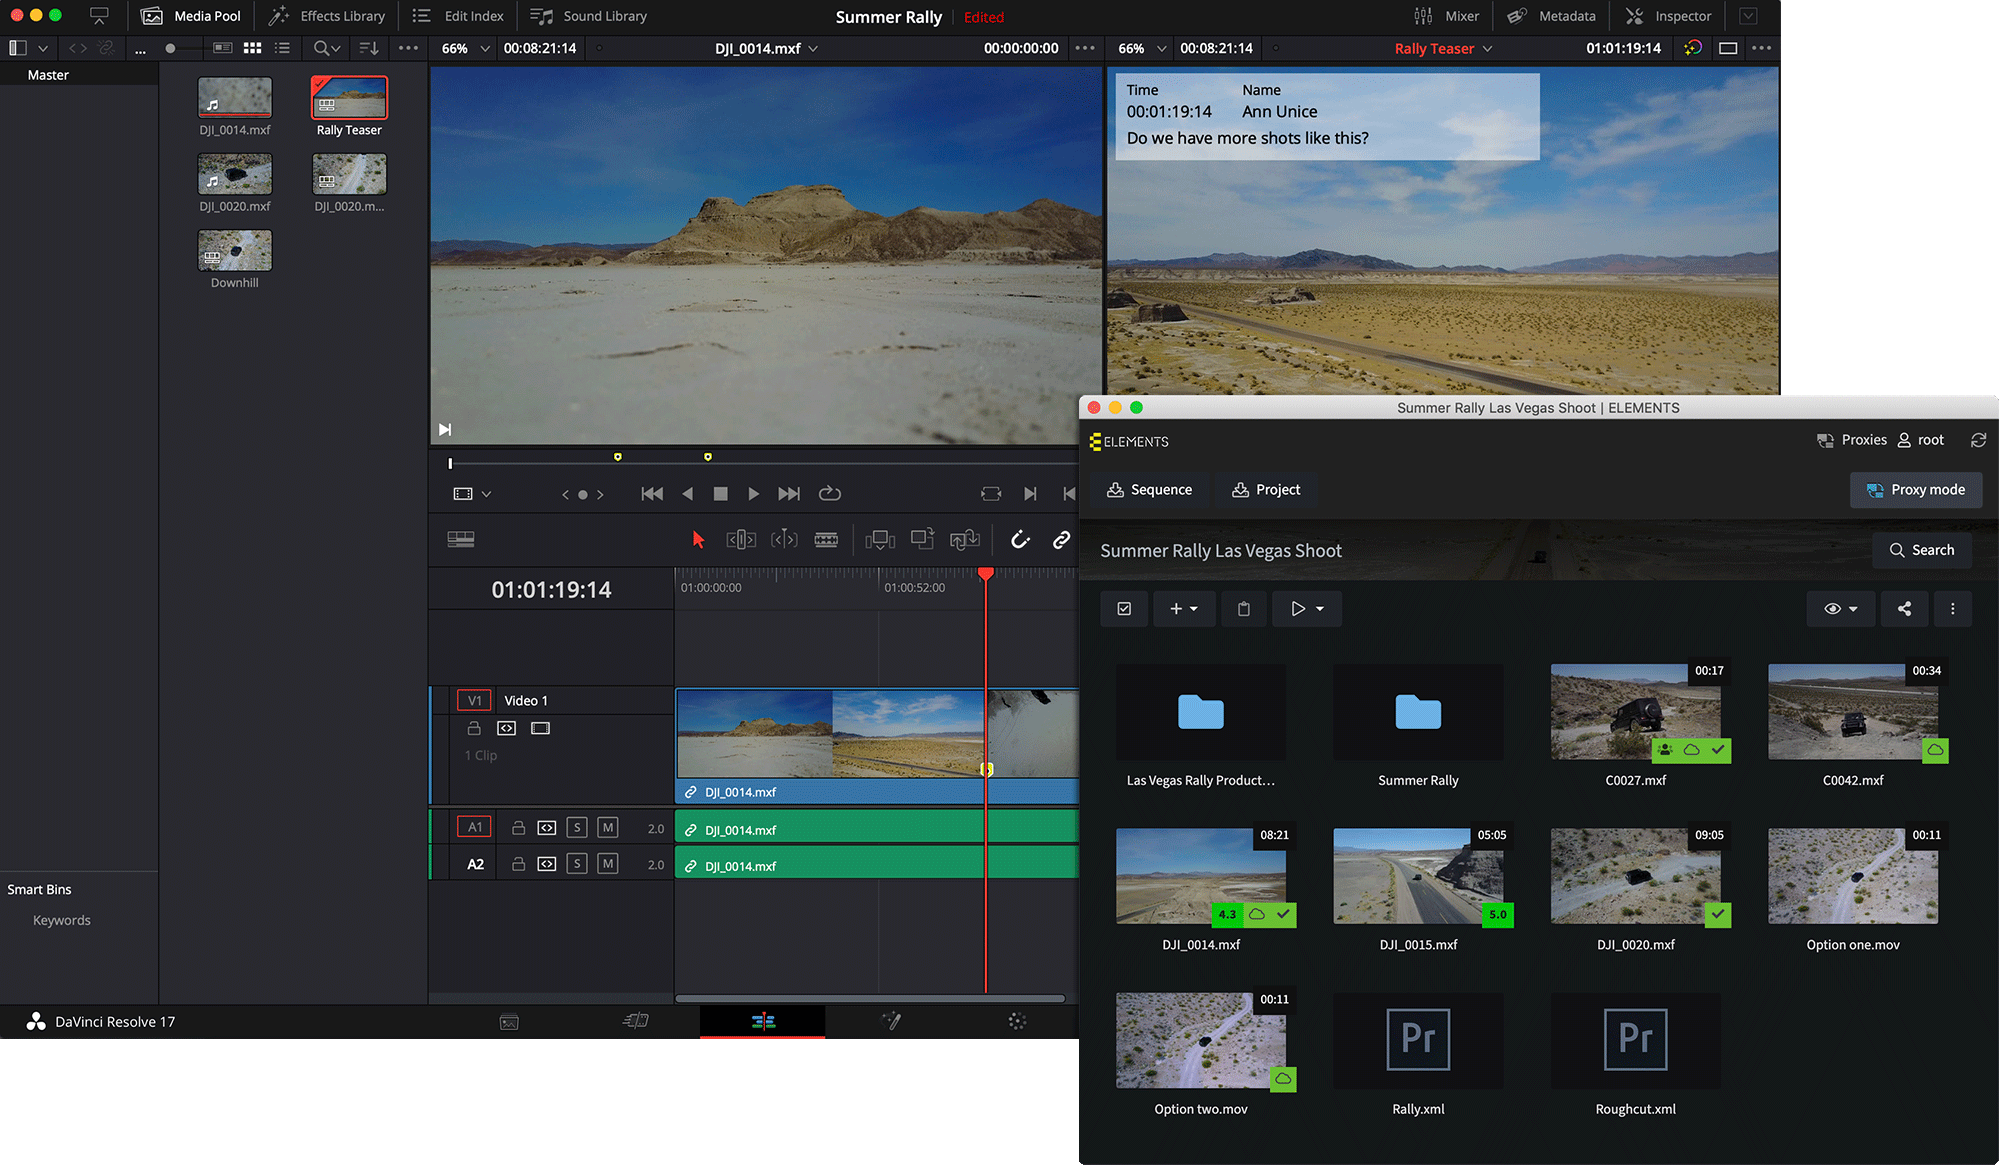
Using the Media Library Proxies
The ELEMENTS Media Library is a powerful, browser-based Media Asset Management platform specifically developed to enhance and simplify your workflows. The browser-based Media Library creates preview proxies to display almost any professional video format.
The ELEMENTS Panel brings the Media Library into DaVinci Resolve and Premiere Pro and allows you to reuse these existing preview proxies from the Media Library for editing in Resolve. After the download has finished, you can switch between the Proxy mode and the Hi-res mode with a single click of a button. This feature saves time by eliminating the often-lengthy proxy creation process in Resolve.
Network
Network is a vast topic, and its troubleshooting highly depends on the setup. Here, we will focus on how to measure the transmission speed and thereby easily recognise potential bottlenecks. If you find this topic interesting, we have written a blog post that goes deeper into the performance optimisation of a high-speed Ethernet link.
Check the Transmission Speed
If you are unsure about the system’s performance, checking the transmission speed between the client and the shared storage is a good idea. This can be done via tools such as AJA System Test or Blackmagic Disk Speed Test, which measure the read and write performance using video files.
 AJA System Test values over a 25 GbE SMB connection
Check the Connection Speed
Iperf is one of the best tools for this job and works differently than the previously mentioned tools. Iperf allows you to measure the transmission speed between two network knots without utilising anything other than RAM and the connected network interfaces. Before starting the tests, ensure proper infrastructure documentation to execute the tests without any possible enhancements. Download Iperf, navigate to the Iperf folder and run the test in both directions.
Server to client with a TCP window size of 1024 kB:
Server side: iperf -w 1024k -s
Client side: iperf -w 1024k -c „server IP Address“
Client to server with a TCP window size of 1024 kB:
Client side: iperf -w 1024k -s
Server side: iperf -w 1024k -c „client IP Address“
Storage
If you are working on your local storage, it is recommended not to keep media on the same partition where DaVinci Resolve is installed.
Task Planning
No matter how fast your storage might be, it is essential to know its capabilities and avoid overloading it with tasks when possible. Avoid scheduling automatic backups and executing large copy jobs during working hours. These kinds of tasks might reduce the storage performance for the editors and lead to stuttering playback and other issues in DaVinci Resolve.
A far better approach is to use the ELEMENTS Automation Engine to schedule these tasks outside working hours. This powerful tool allows you to add any number of other steps to the task, such as sending email or Slack notifications, scanning the copied files for viruses, synching them with a cloud bucket and much more.

Fill Level
It is essential not to run your storage at close to full capacity, as it might lead to reduced performance. In most cases, it is recommended that the fill level does not exceed 80% of your overall storage capacity.
Time Synchronisation
Having the time on your storage and the clients synched up is essential. An NTP server of your choosing can be added in the Maintenance tab in the ELEMENTS Web UI. Your ELEMENTS system can offer time synchronisation to all connected clients.
Shared Storage
The main thing to remember is that there are many different ways to do storage, and not all of them are equally suitable for work with video, even when achieving the same maximal read / write speeds.
The storage demands of the editing workflow can be incredibly high. High bitrates of the used footage, Resolve’s timeline buffering behaviour and the editor’s pace put high expectations on the storage in terms of throughput and latency. For this reason, flash-based storage, such as the SSD-based ELEMENTS ONE and the NVMe-based ELEMENTS BOLT is always the best option.
Equally important is the choice of the file system, together with its optimal configuration for video editing and consultancy when developing and sizing the environment. Therefore, the storage and network planning should not be viewed as a DIY project and is best left to professionals with experience in post-production environments that can guarantee to fulfil your requirements. ELEMENTS specialises in this, so if you’re planning a project, feel free to contact us.
If you have an issue with DaVinci Resolve that was not covered in this article, such as crashes, licensing problems or log collection, take a look at Peters Support and Troubleshooting FAQ at the Blackmagic Forum.