Imagine the following scenario: After the raw footage for your latest project has been ingested onto production storage (potentially through the Secure Upload Automation), it needs reviewing and sorting. This is a process that is often done by assistant editors or the editorial staff, who may use the opportunity to outline the story and give rough guidelines to the editor. This is one of the main use cases for which we have added a Rough-cut Editor into the Media Library, our browser-based MAM.

After the rough-cut is finished, the on-site editor can simply import the project into the NLE of choice and start working. But what happens if editing needs to be done outside of the office, requiring the footage to be sent to the editor? Well, one option is to simply send all raw footage. Clearly an inefficient option, requiring longer copy times, higher capacity requirements and longer upload / download times if sent over the internet. The second option is to sort the footage by hand. This is simply too prone to error when dealing with a large number of clips. The third option is to use an additional application for this process, in most cases the NLE at hand. This unfortunately prolongs the consolidation process while at the same time potentially blocking the application (often for a long period of time). Furthermore, in many cases, the application will not be able to upload the media to the cloud or the FTP server, either because of the limitations of the application or due to the internet access restrictions that are imposed by the content security guidelines. This approach adds one more time-consuming step to the process.
This automated workflow provides a new and extremely easy option. With just a couple of mouse-clicks users can consolidate all media used in an editing project, upload it to the desired location (on-premise or cloud-based) and notify all users involved of the progress. This clever automation works with projects created in either the ELEMENTS Rough-cut Editor or Adobe Premiere Pro.

Analysing the editing project
In the first step of this automation, a custom Python script is executed. It will analyse all sequences found in the selected XML or Premiere Pro project and gather storage paths to the clips used in them. The paths will be stored in the “files” variable that will be passed to other steps upon finishing.
from elements.media.editor.fcpxml import fcpxml_load, is_fcpxml
from elements.media.editor.prproj import prproj_load
from elements.media.editor.project import Project, Bin, Clip

if input.lower().endswith('.xml') and is_fcpxml(input):
    proj = fcpxml_load(input)
elif input.lower().endswith('.prproj'):
    proj = prproj_load(input)
else:
    raise Exception('Format not recognized')

result = []

def scan(item):
    if isinstance(item, (Project, Bin)):
        for child in item.children:
            scan(child)
    if isinstance(item, Clip) and item.source_file:
        result.append(item.source_file)

scan(proj)
print(proj)
ret('files', result)
Upload Media and Project files
The links gathered in the first step are saved in the “files” variable and passed to the Upload Media step. As a part of this task, the media will be uploaded into the specified cloud instance, in this case an Amazon AWS S3 Bucket. Alternatively, the Automation engine allows you to copy files to another file system, upload them to the FTP server or even generate Media Library sharing links. If required, certain storage paths can be excluded from the copy process and further options can be set.
After the Upload Media task has finished successfully, the selected project (saved in the “input” variable) will also be uploaded to the same location.


Notifications
On every step of the automation, notifications have been setup to inform the appropriate user of the progress or potential issues. Upon successful completion of the media locating step and the subsequent cloud uploads, the receiving editor will be notified about the newly uploaded files via an email. The Email step allows for the selection of multiple receivers and the usage of variables allows you to add the project name into the message. For instance:
“Media Files used in the editing project Skateboarding.xml have been uploaded to the cloud.”
If any step in the automation produces an error, the starting user will receive a push notification on every workstation on which they are logged in via the ELEMENTS Client. Alternatively, notifications can also be sent as a Slack message.


Job permissions
The Automation Engine offers multiple levels of user permissions. On the lowest level, users and groups can be granted starting or management permission for the jobs, or the access to the Automation Engine can be restricted altogether. Additionally, for every individual job, starting permissions can be further restricted to any number of chosen users.
In the Advanced tab of the Jobs settings, a security context can be specified. In the examined Automation this setting is set to root – this allows users to copy files onto a file system, which they would otherwise not have access to.
Job initiation
There are four different ways to start any Automation Job:
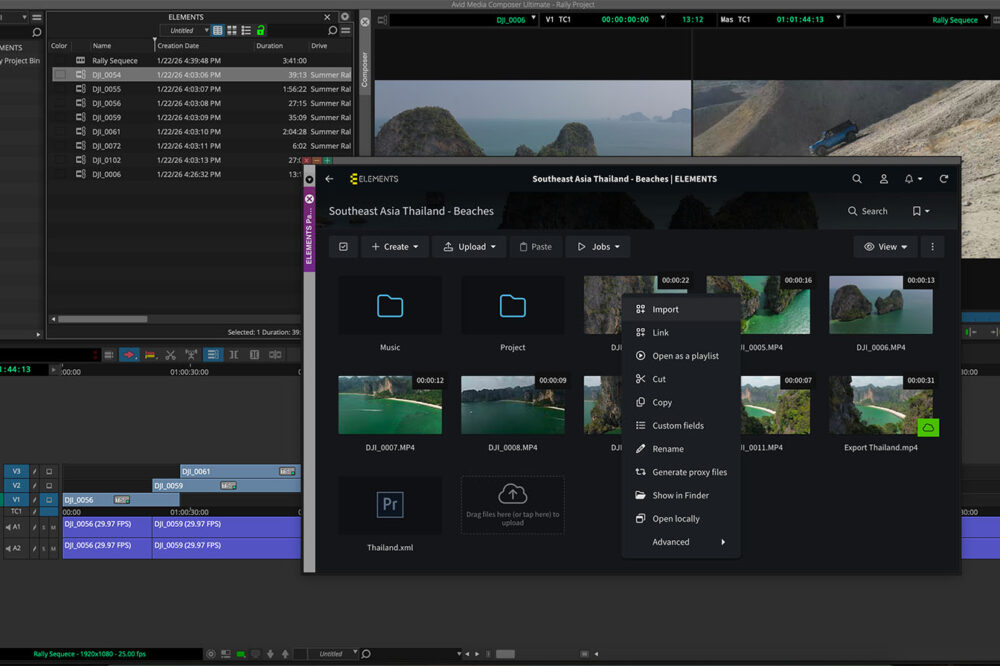
Media Library – select any number of assets in the Media Library and start the Automation in the Jobs dropdown menu. Pro tip: The Automation can also be displayed as a button in the Media Library’s button bar, making the job easier to find. Individual Automation Jobs can be enabled or disabled for every Media Root separately.


MacOS Finder or Windows Explorer – start Automations straight from the context menu of the macOS Finder or Windows Explorer from any workspace mounted via the ELEMENTS Client. This option should be enabled by the user in the Advanced tab of the Automation Jobs settings.


File Manager – management of an ELEMENTS system is done through an easy-to-understand, browser-based UI. Here, the File Manager section allows for quick and intuitive control over the files on the system. Users can move, delete and compress files, as well as start Automation Jobs. Just like in the Media Library, the user can select any number of files or folders and start the Automation in the Jobs dropdown menu.
Scheduling – finally, Jobs can also be scheduled to start at fixed intervals – every hour, day, month etc. The Crontab support also allows users to further specify when to run the job, for instance, only on specific days of the week.
Automation Engine
With the development of the Automation Engine, ELEMENTS has equipped every system with the tools to easily automate a number of post-production processes through an intuitive user interface. Thanks to a large offering of pre-implemented steps users can manage files on the system, transcode footage, send notifications and even execute custom Python and Bash scripts. This time-saving tool allows users with little to no technical knowledge the ability to reliably execute a whole list of complex tasks in a matter of seconds – right from the Media Library, macOS Finder or Windows Explorer.
Do you have a cool use case for the Automation Engine that you would like to share with us? We would love to hear about it.